If you’re just starting your adventure with ConstraintLayout, the new layout that’s available in a support library and is closely integrated with the visual UI editor in Android Studio 2.2.
What is ConstraintLayout in Android?
A ConstraintLayout in Android is a ViewGroup which allows you to position and size widgets in a flexible way. Note: ConstraintLayout is available as a support library that you can use on Android systems starting with API level 9 (Gingerbread).
In this article I’d like to highlight recent additions to ConstraintLayout in Android Studio 2.3 (Beta): chains and ratios, as well as give some general ConstraintLayout tips and tricks.
Chains
Creating chains is a new feature that lets you position views along a single axis (horizontal or vertical), that conceptually is a bit similar to a LinearLayout. As implemented by ConstraintLayout in Android, a chain is a series of views which are linked via bi-directional connections.

To create a chain in the layout editor, select the views you wish to chain together, right click on one of the views and click on “Center views horizontally” (or “Center views vertically”).
This creates the necessary connections for you. Moreover, a new button appears when you select any of the chain elements. It lets you toggle between three chain modes: Spread, Spread Inside, and Packed Chain.
There are two additional techniques you can use when dealing with chains:
Recommended article on Layout:
- Fan Layout Manager for Android
- Android SpaceTabLayout Animation
- Android AdaptiveTableLayout CSV Library
- Android Circular Layout Manager
- AwesomeLayoutManager Android Layout Library
- Two Panels Layout Animation Android Library
If you have a Spread or Spread Inside chain and any views in the chain have their size set to MATCH_CONSTRAINT (or “0dp”), the remaining space in the chain will be distributed among them according to weights defined in layout_constraintHorizontal_weight or layout_constraintVertical_weight.
If you have a Packed chain, you can adjust the horizontal (or vertical) bias to move all elements of the chain left and right (or up and down).
Ratios
Ratios let you accomplish roughly the same thing as a PercentFrameLayout, i.e. restrict a View to a set width to height ratio, without the overhead of the additional ViewGroup in your hierarchy.
To set a ratio for any view inside a ConstraintLayout:
- Make sure at least one of the size constraints is dynamic, i.e. not “Fixed” and not “Wrap Content”.
- Click the “Toggle aspect ratio constraint” that appears in the top left corner of the box.
- Input the desired aspect ratio in width:height format, for example: 16:9
[tmh_article_ads]
Guidelines
Guidelines are virtual views that help you position other views in the layout. They aren’t visible during runtime, but can be used to attach constraints to. To create a vertical or horizontal guideline, select it from the dropdown.
Click on the newly added guideline to select and drag to move it to the desired position.
Click on the indicator at the top (or left) to toggle between guideline positioning modes: fixed distance from left/right (or top/bottom) in dp, and percentage of parent view width/height.
Dealing with View.GONE
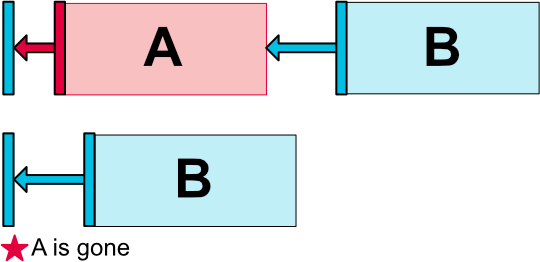
When dealing with View.GONE visibility of Views in ConstraintLayout, you have more control compared to RelativeLayout. First of all, any View that is set to GONE shrinks to zero size in both dimensions, but still participates in calculating constraints. Any margins set on the constraints on this View are also set to zero.
In many cases, a set of views connected by constraints such as in the example above will just work when setting a view to GONE.
There is also a way to specify a different margin for a constraint in case a view to which the constraint is attached gets removed via GONE. Use one of the layout_goneMarginStart (…Top, …End, and …Bottom) attributes to do that.
This enables handling more complex situations such as the one demonstrated above without code changes to handle the GONE state of certain Views.
Different kinds of centering
When I discussed the chains feature of ConstraintLayout, I mentioned one type of centering already. When you select a group of views and click on “Center horizontally” (or “center vertically”), you create a chain.
You can also use the same option when selecting just one view to center it between the closest views that it can attach its constraints to:
To ignore any other views and just center in the parent, choose the “Center horizontally/vertically in parent” option. Note that normally you will use this with a single view, as this does not create a chain.

Sometimes you might want to align two views of different sizes together according to their centers. When a view has two constraints that are pulling at it from two different sides, the view will stay centered between those two constraints (as long as the bias is set to 50%).
We can use the same approach to align the center of one view with one side of another, by connecting both constraints to the same handle:
Using Spaces for negative margins
A view in a ConstraintLayout cannot have negative margins (it’s not supported). However, with an easy trick you can have similar functionality by inserting a Space (which is essentially an empty View) and setting its size to the margin you want. Here’s how it looks in practice:
When to use Inference with ConstraintLayout in Android?
When you invoke the “Infer constraints” command in the toolbar, the layout editor tries to figure out any missing constraints on the views in your ConstraintLayout and adds them automagically. It can work on a layout with no constraints whatsoever, but since it’s a difficult problem to create a whole layout correctly, you might get mixed results. That’s why I propose two approaches to using constraint inference:
[tmh_article_ads]
The first approach is to create as many constraints by hand, so that your layout mostly works and is functional. Then, click infer for the few views that are still missing constraints. This can save you a little bit of work.
The other one is to start with positioning your views on the layout editor canvas without creating constraints, use infer and then change the preview device resolution. See which views resized and changed position incorrectly, fix those constraints then repeat with another resolution.
It all boils down to your preference really, as everyone will have different styles of creating constraints in their layouts, including crafting all of them manually.
Match parent is not supported
Use match_constraint (0 dp) instead and attach constraints to the sides of the parent view if you wish. This provides similar functionality with correct handling of margins. “Match parent” should not be used inside ConstraintLayout at all.
If you have any ConstraintLayout tricks of your own, don’t hesitate to include share them as a reply to this article for others to see!
Share your thoughts