Image processing is a hard task for any developers and today i came with thumbnail generation java library called Thumbnailator. It can off some hard task to creating high-quality thumbnails in Java.
Why Thumbnailator?
Learning how to use the Image I/O API, Java 2D API, image processing, image scaling techniques, … but fear not! Thumbnailator will take care of all those things for you!
Thumbnailator is a single JAR file with no dependencies to external libraries, making development and deployment simple and easy. It is also available on the Maven Central Repository for easy inclusion in Maven projects.
How simple is Thumbnailator?
Thumbnailator‘s fluent interface can be used to perform fairly complicated thumbnail processing task in one simple step.
For example, creating JPEG thumbnails of image files in a directory, all resized to a maximum dimension of 640 pixels by 480 pixels while preserving the aspect ratio of the original image can be performed by the following:
Thumbnails.of(new File("path/to/directory").listFiles())
    .size(640, 480)
    .outputFormat("jpg")
    .toFiles(Rename.PREFIX_DOT_THUMBNAIL);
The fluent interface provided by the Thumbnailator simplifies the task of making thumbnails into a single method call!
No need to access the Image I/O API and manually manipulate BufferedImages through Graphics2D objects. Thumbnailator does all of that for you.
What is features of Thumbnail Generation Java Library
- Create high-quality thumbnails from existing images.
| Large | Medium | Small | Method |
|---|---|---|---|
 |
 |
 |
Thumbnailator |
 |
 |
 |
Graphics.drawImage |
- Option to embed a watermark (such as a logo) in the thumbnails.
- Transparency of the watermark is adjustable from transparent (0%) to opaque (100%).
| 20% opacity | 50% opacity | 80% opacity | 100% opacity |
|---|---|---|---|
 |
 |
 |
 |
- Supports rotation of thumbnail.
| 0 deg. rotation | 90 deg. rotation | 180 deg. rotation | 270 deg. rotation | 45 deg. rotation |
|---|---|---|---|---|
 |
 |
 |
 |
 |
- A fluent interface to simplify the process of making thumbnails programmatically.For example, the code in the previous example for rotating thumbnails was written as follows:
for (int i : new int[] {0, 90, 180, 270, 45}) {
    Thumbnails.of(new File("coobird.png"))
            .size(100, 100)
            .rotate(i)
            .toFile(new File("image-rotated-" + i + ".png"));
}
- Multiple quality modes for thumbnail generation.
- Preserves the aspect ratio of resulting thumbnail, if desired.
Some example which you can do with this
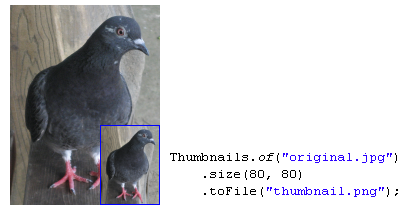
Create a thumbnail from an image file
Thumbnails.of(new File("original.jpg"))
        .size(160, 160)
        .toFile(new File("thumbnail.jpg"));
In this example, the image from original.jpg is resized, and then saved to thumbnail.jpg.
Alternatively, Thumbnailator will accept file names as a String. Using File objects to specify image files is not required:
Thumbnails.of("original.jpg")
        .size(160, 160)
        .toFile("thumbnail.jpg");
This form can be useful when writing quick prototype code, or when Thumbnailator is being used from scripting languages.
Create a thumbnail with rotation and a watermark
Thumbnails.of(new File("original.jpg"))
        .size(160, 160)
        .rotate(90)
        .watermark(Positions.BOTTOM_RIGHT, ImageIO.read(new File("watermark.png")), 0.5f)
        .outputQuality(0.8)
        .toFile(new File("image-with-watermark.jpg"));
In this example, the image from original.jpg is resized, then rotated to clockwise by 90 degrees, then a watermark is placed at the bottom right-hand corner which is half transparent, then is saved to image-with-watermark.jpg with 80% compression quality settings.
Create a thumbnail and write to an OutputStream
OutputStream os = ...;

Thumbnails.of("large-picture.jpg")
        .size(200, 200)
        .outputFormat("png")
        .toOutputStream(os);
In this example, an image from the file large-picture.jpg is resized to a maximum dimension of 200 x 200 (maintaining the aspect ratio of the original image) and writes the that to the specified OutputStream as a PNG image.
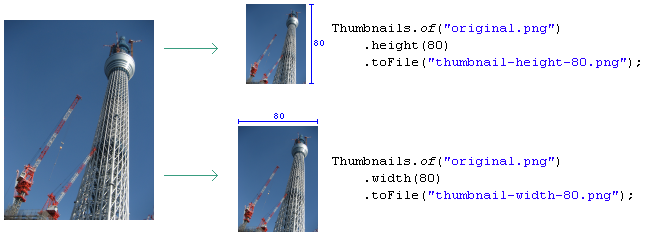
Creating fixed-size thumbnails
BufferedImage originalImage = ImageIO.read(new File("original.png"));

BufferedImage thumbnail = Thumbnails.of(originalImage)
        .size(200, 200)
        .asBufferedImage();
The above code takes an image in originalImage and creates a 200 pixel by 200 pixel thumbnail using and stores the result in thumbnail.
Scaling an image by a given factor
BufferedImage originalImage = ImageIO.read(new File("original.png"));

BufferedImage thumbnail = Thumbnails.of(originalImage)
        .scale(0.25)
        .asBufferedImage();
The above code takes the image in originalImage and creates a thumbnail that is 25% of the original image, and uses the default scaling technique in order to make the thumbnail which is stored in thumbnail.
Rotating an image when creating a thumbnail
BufferedImage originalImage = ImageIO.read(new File("original.jpg"));

BufferedImage thumbnail = Thumbnails.of(originalImage)
        .size(200, 200)
        .rotate(90)
        .asBufferedImage();
The above code takes the original image and creates a thumbnail which is rotated clockwise by 90 degrees.
Creating a thumbnail with a watermark
BufferedImage originalImage = ImageIO.read(new File("original.jpg"));
BufferedImage watermarkImage = ImageIO.read(new File("watermark.png"));

BufferedImage thumbnail = Thumbnails.of(originalImage)
        .size(200, 200)
        .watermark(Positions.BOTTOM_RIGHT, watermarkImage, 0.5f)
        .asBufferedImage();
As shown, a watermark can be added to an thumbnail by calling the watermark method.
The positioning can be selected from the Positions enum.
The opaqueness (or conversely, transparency) of the thumbnail can be adjusted by changing the last argument, where 0.0f being the thumbnail is completely transparent, and 1.0f being the watermark is completely opaque.
Writing thumbnails to a specific directory
File destinationDir = new File("path/to/output");

Thumbnails.of("apple.jpg", "banana.jpg", "cherry.jpg")
        .size(200, 200)
        .toFiles(destinationDir, Rename.PREFIX_DOT_THUMBNAIL);
This example will take the source images, and write the thumbnails them as files to destinationDir (path/to/output directory) while renaming them with thumbnail. prepended to the file names.
Therefore, the thumbnails will be written as files in:
path/to/output/thumbnail.apple.jpgpath/to/output/thumbnail.banana.jpgpath/to/output/thumbnail.cherry.jpg
It’s also possible to preserve the original filename while writing to a specified directory:
File destinationDir = new File("path/to/output");

Thumbnails.of("apple.jpg", "banana.jpg", "cherry.jpg")
        .size(200, 200)
        .toFiles(destinationDir, Rename.NO_CHANGE);
In the above code, the thumbnails will be written to:
path/to/output/apple.jpgpath/to/output/banana.jpgpath/to/output/cherry.jpg
Hope you like this please comment your thoughts below.
Share your thoughts