")
Svelte is a newborn baby in the field of the Node web framework world. Today I am going to share Svelte Cheatsheet. After this tutorial, You get a brief idea about this awesome framework. But one question would arise in your mind:
Why you should read about the Svelte framework?
It is a radical new approach to building user interfaces. Whereas traditional frameworks like React and Vue do the bulk of their work in the browser, Svelte shifts that work into a compile step that happens when you build your app.
- Write less code: Build boilerplate-free components using languages you already know — HTML, CSS, and JavaScript.
- No virtual DOM: Svelte compiles your code to tiny, framework-less vanilla JS — your app starts fast and stays fast.
- Truly reactive: No more complex state management libraries — Svelte brings reactivity to JavaScript itself.
VSCode is the best IDE for Node application and 20 + Bonus VSCode Shortcuts for Every developer should know.
Now let’s start our crash course or Svelte Cheatsheet.
[tmh_article_ads]
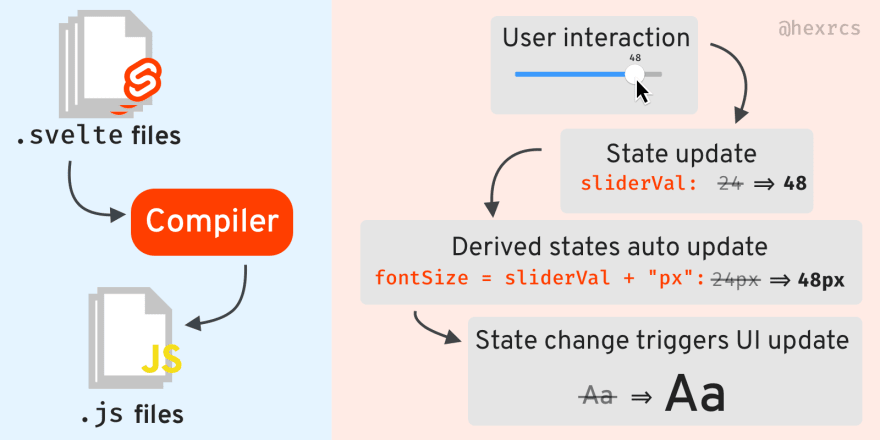
How Svelte works
- Compiler: Doesn’t ship a Svelte “library” to users, but build-time optimized plain JS
- Components: App is made up of composable UI elements
- Reactive: Event/User interaction triggers chain of state changes, auto-updating components throughout the entire app
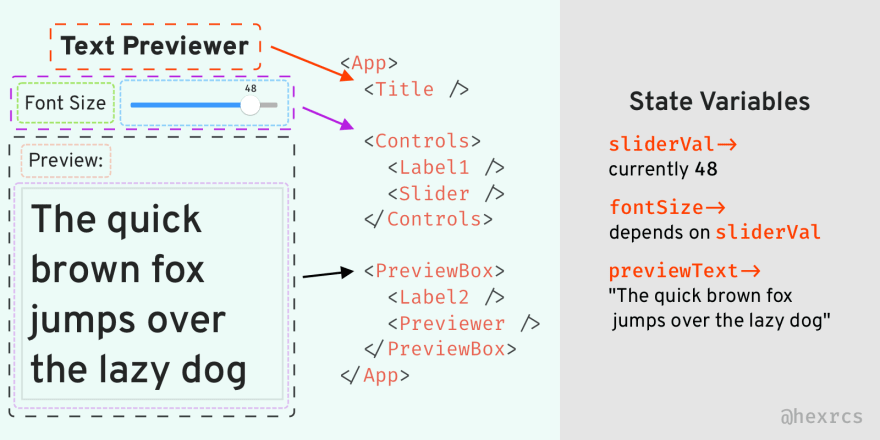
UI Is a Component Tree
A component defines how your app should interpret some abstract “state” values, so that it can turn them into DOM elements in your browser, and ultimately pixels on your screen.
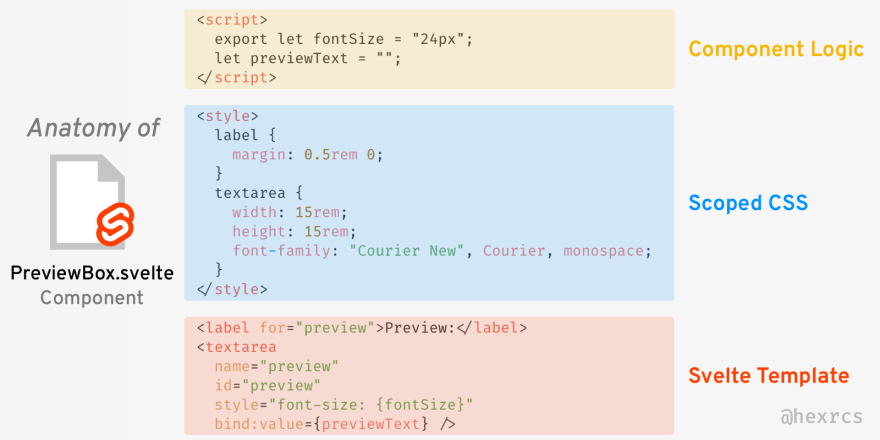
The Anatomy of a Svelte Component
Each .svelte file contains a single component, consisting of 3 parts:
<script>is component logic in JS<style>is CSS styling, scoped and applied to only the current component- Svelte template, based on HTML but can use custom components and inline logic (like JSX)
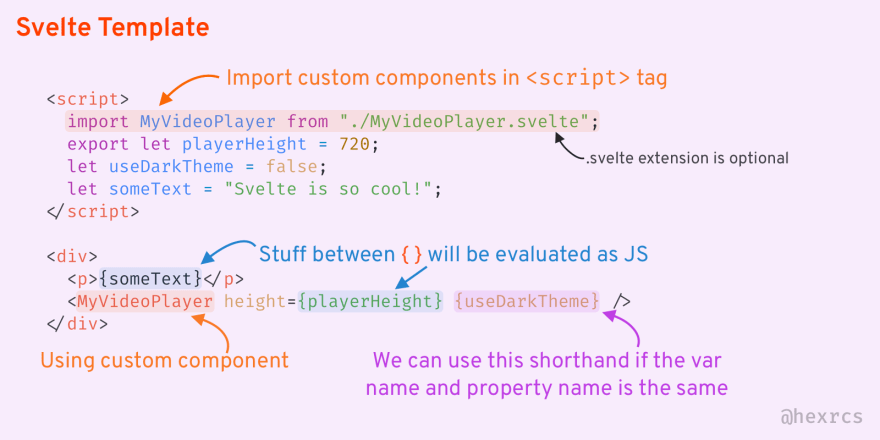
The Svelte Template
The Svelte template allows us to use our own custom components in addition to HTML elements. The .svelte file extension is optional if there’s no ambiguity, but the first letter of a custom component MUST be in uppercase.
We can use JS expressions inside curly braces { }.
Setting “Props”
A common way to “control” how a child component behaves is to pass data into it as props (properties).
To accept a prop, expose a variable with export. It’s important to use let because const is not reassignable.
Setting a prop is just like doing regular HTML.

Updating the Component States
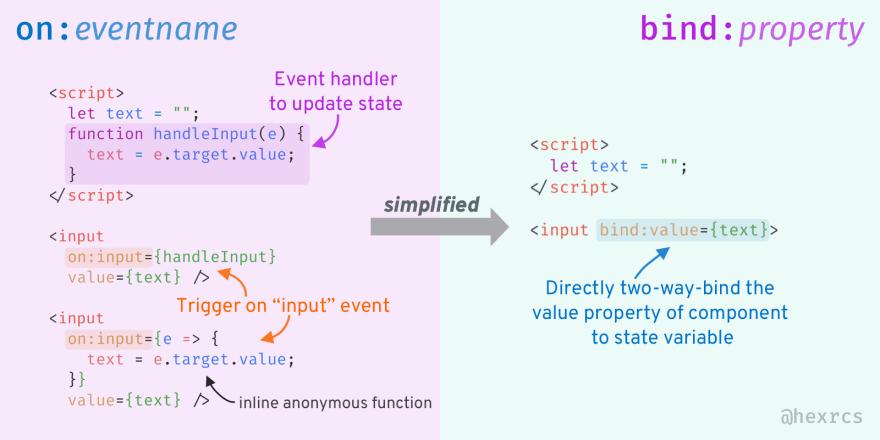
User actions trigger events. on: lets us listen to events and fire functions to update states. State changes will auto-update the UI.
You can see this also: Development Trends and Web Technology Stacks in 2019
Data generally flows from a parent to a child, but we can use bind: to simplify the state-update logic by allowing two-way data flow.
$: Reactive Statements
“Reactive statements” are those statements marked by $:.
Svelte analyzes which variables they depend on. When any of those dependencies changes, the corresponding reactive statements will be rerun. Very useful for declaring derived states, or triggering “side effects”.

Reactive State “Store”
A reactive “store” makes it easy to share states across many components. It can exist in a separate JS file. To create a store, just wrap writable around a value.
In a component, we prefix store names with a $ in order to directly use or update them. Compiler magic!

Conditional Rendering And Lists
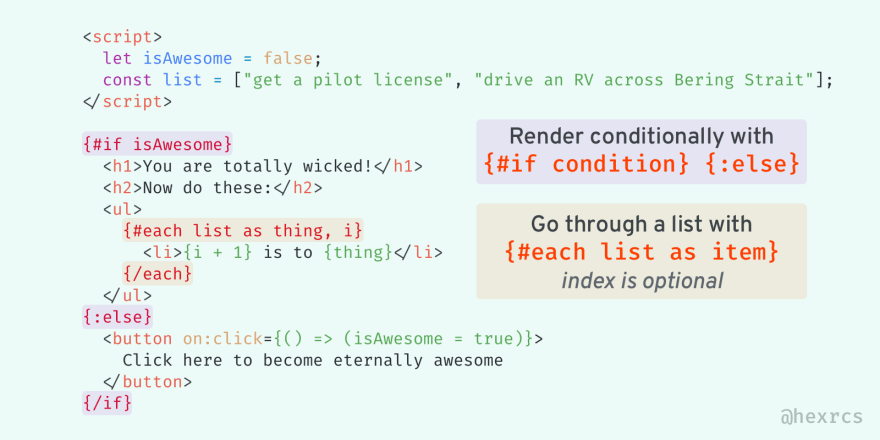
We can conditionally render elements with Svelte’s template via {#if} and optionally {:else}.
To render everything in a list, we have {#each}.
Remember to always close a block with {/if} or {/each}!
(Should’ve used <ol> in the example, but I wanted to show how index- access works.)
Elegant Async/Await
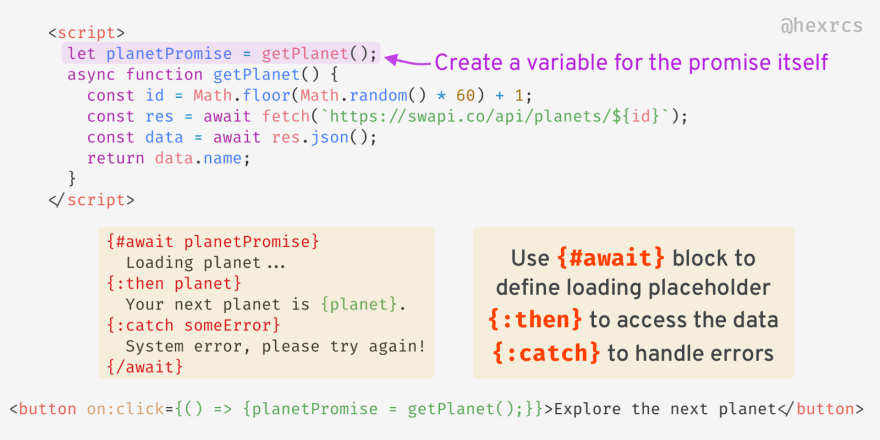
It’s super easy to do asynchronous stuff like API requests with Svelte.
We can simply {#await} a Promise to resolve, displaying a “loading” placeholder before the result is ready.
Note that we await the Promise in the template section, so no await keyword in <script>.
? That’s All, Folks!
That’s it – everything you need to get started with Svelte! ?
We covered a lot in this crash course, from the most fundamental concepts to topics that might even be considered intermediate or advanced in other frameworks (eg. API requests and animated transitions).
Now it’s your turn to play with Svelte and build something cool and share with us.
Share your thoughts