
When I decided to implement Navigation Drawer into our Application, I was not satisfied with the implementations that I have seen in other applications or concepts in Dribbble. I was looking for something simple and catchy at the same time so I found this cool concept and hope you also like this.
Firstly see the demo Navigation Drawer with Wave Animation concept:
The idea is to create wave transitions below the header when the user opens the Navigation Drawer, the transitions have to be meaningful so I created a loop of 5 different waves that synched with each other in a series order using Android’s VectorDrawable.
Why use a VectorDrawable?
Vectors work much like SVG there is no lose quality as they are scaled up or down. Unlike popular image formats like Bitmap, JPEG, GIF, and PNG, plus you can define animations on path commands on (how to draw lines and arcs) and just like Path commands when working with Canvas, drawing and rendering.
If you try to do animations with PNG files or using GIF files for our animation we will end up with hundreds of PNGS or huge files size for GIFs.

Let’s Build Navigation Drawer with Wave Animation!
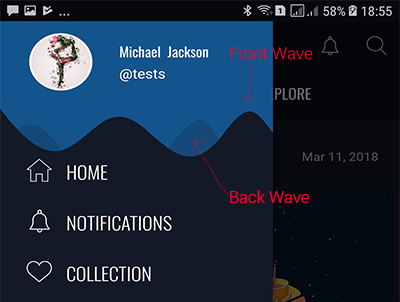
First, we need to create the paths for each wave transition we have 2 waves per transition lets call the first Wave “Front” and the second wave “Back”.
But how we create Path Data Commands? well after spending quite a time to understand to how to create them, it was fairly easy to understand the basics such as drawing lines but if you try to draw a complex design like the waves we are trying to create here, it’s almost impossible to imagine mathematically how to draw that , but VectorDrawables have a lot of similarities of SVG files and Path data is almost identical in both formats (you can convert directly SVG file to Vector Drawable through Android Studios), we going to use GIMP as tool for SVG Creation then we going to import that into Vector Drawable.

Step 1:
GIMP has a Path Drawing tool which we will use to draw our Wave Path in the following GIF we have 5 drawings for the Back Wave.
As you can see each wave has 8 points(commands), one of the requirements is that the VectorDrawable you are animating from and to should share the same number of commands.
Using GIMB export path option can we can see the path command starting with “d=” as following
<svg xmlns="http://www.w3.org/2000/svg"
     width="3.88889in" height="4.18056in"
     viewBox="0 0 280 301">
  <path id="wave_front_0 #1"
        fill="none" stroke="black" stroke-width="1"
        d=" C 37.25,25.50 16.75,25.25 -0.67,25.33
              -0.67,25.33 0.00,300.00 0.00,300.00
             0.00,300.00 280.00,300.00 280.00,300.00
             280.00,300.00 281.92,235.25 279.25,25.25
             268.50,25.25 253.50,25.50 231.25,25.25
             201.25,25.00 220.75,25.50 163.25,25.25
             141.75,25.25 133.50,25.25 113.25,25.25
             97.75,25.50 99.30,24.67 59.12,24.75 Z" />
</svg>
Unfortunately, we will have to repeat this process 10 times for the 2 waves and export 10 SVG files, once we are done we can start implementation in Android Studio.
Step 2:
We have to add VectorDrawable support to the projet’s Gradle
defaultConfig {
    applicationId "zatrek.wavenavigationdrawer"
    minSdkVersion 16
    targetSdkVersion 26
    versionCode 1
    versionName "1.0"
    vectorDrawables.useSupportLibrary = true
}
dependencies {
compile 'com.android.support:support-vector-drawable:26.0.0'
compile 'com.android.support:animated-vector-drawable:26.0.0'
}
Step 3:
Now we have to create the main Vector(default_background) to be set as background
<?xml version="1.0" encoding="utf-8"?>
<vector xmlns:android="http://schemas.android.com/apk/res/android"
    android:width="@dimen/_216sdp"
    android:height="@dimen/_216sdp"
    android:viewportWidth="280"
    android:viewportHeight="301">

    <path
        android:name="Front"
        android:fillColor="@color/default_page_blue"
        android:pathData="M 59.12,24.75
           C 37.25,25.50 16.75,25.25 -0.67,25.33
              -0.67,25.33 0.00,300.00 0.00,300.00
             0.00,300.00 280.00,300.00 280.00,300.00
             280.00,300.00 281.92,235.25 279.25,25.25
             268.50,25.25 253.50,25.50 231.25,25.25
             201.25,25.00 220.75,25.50 163.25,25.25
             141.75,25.25 133.50,25.25 113.25,25.25
             97.75,25.50 99.30,24.67 59.12,24.75 Z" />

    <path
        android:name="Back"
        android:fillColor="@color/default_page_blue"
        android:fillAlpha="0.2"
        android:pathData="M 51.33,50.33
           C 28.67,50.33 17.33,50.33 -0.67,50.33
              -0.67,50.33 0.00,300.00 0.00,300.00
             0.00,300.00 280.00,299.50 280.00,299.50
             280.00,299.50 279.58,192.58 278.33,50.33
             263.67,50.33 267.67,50.33 256.67,50.33
             222.33,50.00 246.67,50.33 206.67,50.33
             180.00,50.33 166.67,50.67 145.33,50.67
             100.33,50.33 78.67,50.00 51.33,50.33 Z" />
</vector>
Note:
- The default Vector has 2 paths each one has a unique name as an identifier the first Path represents the front wave and the second path for the back wave
- fillColor is property is used to change the color of the wave
- fillAlpha is used for the second wave to make it dimmer
- pathData is the SVG Path generated through GIMB

Step 4:
Create animated-vectors to animate each transition
<?xml version="1.0" encoding="utf-8"?>
<animated-vector
    xmlns:android="http://schemas.android.com/apk/res/android"
    android:drawable="@drawable/default_background">

    <target
        android:name="Front"
        android:animation="@animator/front_wave_path1" />

    <target
        android:animation="@animator/back_wave_path1"
        android:name="Back"/>


</animated-vector>
Note:
- android:drawable is the main vector and in our case is the default background vector
- target:name the unique name of the path inside the main vector
- target:animation is used for the animation of each target
Step 5:
Create objectAnimators for each Target animation
<set xmlns:android="http://schemas.android.com/apk/res/android">
    <objectAnimator
        xmlns:android="http://schemas.android.com/apk/res/android"
        android:duration="1200"
        android:propertyName="pathData"
        android:valueFrom="
         M 51.33,50.33
           C 28.67,50.33 17.33,50.33 -0.67,50.33
             -0.67,50.33 0.00,300.00 0.00,300.00
             0.00,300.00 280.00,299.50 280.00,299.50
             280.00,299.50 279.58,192.58 278.33,50.33
             263.67,50.33 267.67,50.33 256.67,50.33
             222.33,50.00 246.67,50.33 206.67,50.33
             180.00,50.33 166.67,50.67 145.33,50.67
             100.33,50.33 78.67,50.00 51.33,50.33 Z"
        android:valueTo="
  M 63.67,39.33
           C 44.00,51.67 29.67,-6.33 -0.33,28.00
             -0.33,28.00 0.00,300.00 0.00,300.00
             0.00,300.00 279.71,300.00 279.71,300.00
             279.71,300.00 278.33,215.00 280.00,35.00
             280.00,31.00 281.00,27.50 279.67,23.00
             247.00,1.00 227.50,7.50 176.00,34.00
             165.67,39.33 150.67,45.00 126.33,24.67
             103.67,7.00 79.33,29.00 63.67,39.33 Z"
        android:valueType="pathType" />

</set>
here where the magic is happening when we call this animator the values of the pathData will change from valueFrom to valueTo in a given duration 1200 ms (as you can notice both values contains 8 points or commands )
Step 6:
Building the Navigation drawer and attaching and controlling the wave animation
first, we have to build the layout of the DrawerLayout
we will create a LinearLayout that has 2 children the first will be our header and the second will our wave container and inside it a RecyclerView for menu items
<?xml version="1.0" encoding="utf-8"?>
<android.support.v4.widget.DrawerLayout xmlns:android="http://schemas.android.com/apk/res/android"
    xmlns:app="http://schemas.android.com/apk/res-auto"
    xmlns:tools="http://schemas.android.com/tools"
    android:id="@+id/drawer_layout"
    android:layout_width="match_parent"
    android:layout_height="match_parent"
    android:fitsSystemWindows="true"
    tools:openDrawer="start">

    <include
        layout="@layout/app_bar_main"
        android:layout_width="match_parent"
        android:layout_height="match_parent" />


    <android.support.design.widget.NavigationView
        android:id="@+id/nav_view"
        android:layout_width="@dimen/_216sdp"
        android:layout_height="match_parent"
        android:layout_gravity="start"
        android:overScrollMode="never"
        android:background="@color/colorAccent"
        >


            <LinearLayout
                android:layout_width="match_parent"
                android:background="@color/zatrek_blue"
                android:layout_height="match_parent"
                android:overScrollMode="never"
                android:orientation="vertical">
                <include layout="@layout/menu_header" />

                <RelativeLayout
                    android:background="@drawable/default_background"
                    android:id="@+id/WaveContainer"
                    android:layout_width="match_parent"
                    android:layout_marginBottom="-3dp"
                    android:layout_height="match_parent">

                    <android.support.v7.widget.RecyclerView
                        android:layout_marginTop="@dimen/_60sdp"
                        android:visibility="visible"
                        android:background="@android:color/transparent"
                        android:overScrollMode="never"
                        android:id="@+id/nav_drawer_recycler_view"
                        android:layout_width="300dp"
                        android:layout_height="match_parent"

                        />


                </RelativeLayout>


            </LinearLayout>


    </android.support.design.widget.NavigationView>

</android.support.v4.widget.DrawerLayout>
public class Activity_Main extends AppCompatActivity {

    private int AnimateNumber = 1 ;
    DrawerLayout mDrawer;
    NavigationView navigationView;
    RecyclerView recyclerView;
    RelativeLayout WaveContainer;


    @Override
    protected void onCreate(Bundle savedInstanceState) {
        super.onCreate(savedInstanceState);
        setContentView(R.layout.activity_main);
        Toolbar toolbar = (Toolbar) findViewById(R.id.toolbar);
        setSupportActionBar(toolbar);

        mDrawer = (DrawerLayout) findViewById(R.id.drawer_layout);
        ActionBarDrawerToggle toggle = new ActionBarDrawerToggle(
                this, mDrawer, toolbar, R.string.navigation_drawer_open, R.string.navigation_drawer_close);
        mDrawer.addDrawerListener(toggle);
        toggle.syncState();

        navigationView = (NavigationView) findViewById(R.id.nav_view);
        recyclerView = navigationView.findViewById(R.id.nav_drawer_recycler_view);
        WaveContainer = navigationView.findViewById(R.id.WaveContainer);
        recyclerView.setLayoutManager(new LinearLayoutManager(this));
        Adapter_menu adapter_menu =   new Adapter_menu(this, new Adapter_menu.ListenerOnMenuItemClick() {
            @Override
            public void Item(int Position) {
                mDrawer = (DrawerLayout) findViewById(R.id.drawer_layout);
                mDrawer.closeDrawer(GravityCompat.START);
            }
        });
        recyclerView.setAdapter(adapter_menu);

        mDrawer.addDrawerListener(new DrawerLayout.DrawerListener() {
            @Override
            public void onDrawerSlide(View drawerView, float slideOffset) {


            }
            @Override
            public void onDrawerOpened(View drawerView) {
                StartAnimation();
            }

            @Override
            public void onDrawerClosed(View drawerView) {

            }

            @Override
            public void onDrawerStateChanged(int newState) {

            }
        });

    }


    private void  StartAnimation(){


        AnimatedVectorDrawableCompat drawable = null;
        switch (AnimateNumber){
            case 1:
                drawable =  AnimatedVectorDrawableCompat.create(this,R.drawable.animate_wave_1);
                break;
            case 2:
                drawable =  AnimatedVectorDrawableCompat.create(this,R.drawable.animate_wave_2);
                break;
            case 3:
                drawable =  AnimatedVectorDrawableCompat.create(this,R.drawable.animate_wave_3);
                break;
            case 4:
                drawable =  AnimatedVectorDrawableCompat.create(this,R.drawable.animate_wave_4);
                break;
            case 5:
                drawable =  AnimatedVectorDrawableCompat.create(this,R.drawable.animate_wave_5);
                AnimateNumber = 0;
                break;
            default:
                drawable =  AnimatedVectorDrawableCompat.create(this,R.drawable.animate_wave_1);
        }


        AnimateNumber ++ ;
        WaveContainer.setBackground(drawable);
        assert drawable != null;
        drawable.start();
    }
Note:
- StartAnimation function is triggered by DrawerListener when the drawer opens every time
- we have a global variable called AnimateNumber to track the current number of the wave transition and reset that number after the 5th
- WaveContainer background is changed first then the animation starts
Source code link:
I Hope that this tutorial will help you in building great Drawers. Post me anything you build, on this post.
Share your thoughts